

How To Upload Raw Data To Geo
GEO File Transfer Protocol (FTP)
Login required to view complete FTP instructions with credentials and examples.
Stride i. Request personalized upload space for your GEO account (/user)
Your personalized upload infinite is being created. Delight refresh this page in a few seconds.![]()
Pace 1. Your personalized upload space is: uploads/personal_folder_name
Step ii. Transfer files to your personalized upload space co-ordinate to FTP upload instructions below
Transfer Files
GEO is a repository requiring both raw *and* candy information for submissions (see requirements here). Raw file-only submissions should be made direct to SRA.
- Do not begin transferring files until you have gathered and are fix to upload all required components (raw data files, processed data files and metadata spreadsheet). The upload area has limited infinite capacity, we do not accept resource to store fractional submissions. Therefore, delight initiate transfer but once you have gathered all required files.
- Create a new folder on your computer that has a meaningful name (eastward.g. geo_submission_march13) and place all of your submission files into the folder. If your submission is comprised of several datasets (e.one thousand. ChIPseq, RNAseq, RRBS, etc) it is OK to organize the files for each data type into its own subfolder (e.1000. geo_submission_mar13/ChIPseq).
- Confirm the size of your folder and contact united states of america if your submission exceeds 1 terabyte in size. Please practise non go along with an upload larger than one terabyte until you lot hear back from GEO.
- For PC/Mac Bone users nosotros recommend transferring files with the gratis third-political party software, FileZilla Client. Delight see below for detailed examples and other options.
- For LINUX/UNIX users, nosotros recommend transferring files with 'ncftp' or 'lftp', simply you can also use 'ftp', 'sftp', or 'ncftpput'. Please see below for detailed examples.
- Our FTP server credentials are:
host accost username password - Afterwards connecting, you must navigate to your personalized upload space: uploads/personal_folder_name
- After navigating to your personalized upload space, transfer the meaningfully-named submission folder from your reckoner to our server.
- Notify usa (Step 3) and list the meaningfully-named folder in your notification. Do not proceed to Step 3 (beneath) until your transfer has completed.
Step three. Later on the FTP transfer is complete, notify GEO using the Submit to GEO web form
You must notify u.s.a. after uploading your files. If you neglect to notify united states your files will be automatically deleted from the server after ii weeks. One time notified, we move files to a safety location for review.
Hints and tips
- Your upload should include 3 components: (1) raw information files, (2) processed data files, and (3) completed Metadata Template.
- Files can be compressed using gzip or bzip2, and may be submitted in a tar archive only archiving and/or compressing your files is non required. Practise NOT USE ZIP!
- File names should Non include any sensitive information (these will appear publicly).
- File names should be unique (DO Non upload subdirectories containing identically-named files).
- Avoid whitespace and special characters in file names. Apply merely alphanumerals [A-Z, a-z, 0-9], underscores [_] and dots [.].
- Practise not utilize gz- or bzip2-compression on binary files (.BigWig, .bw, .bigBed, .bb, .h5, .bam, .tdf, etc).
- For high-throughput sequencing submissions, we recommend providing the MD5 checksums for the files that yous are uploading (details below).
- Please utilize passive & binary modes when transferring files.
- The FTP server is a temporary storage space. Files will be moved by curators to an internal location for processing and assigning of accessions.
- Files deposited on the FTP site are not displayed under 'My Submissions' on the web interface. The web interface only displays accessioned submissions.
- You must notify u.s. afterwards uploading your files. If yous fail to notify us your files will be automatically deleted from the server after two weeks.
Connecting with FileZilla
You tin quickly connect by inbound the host (), username (), and password () into the 'Quickconnect' toolbar. Yous will see an error with 'Quickconnect':

Ignore this error. Enter the path to your personalized workspace in the 'Remote site' address bar (your path is: /uploads/):
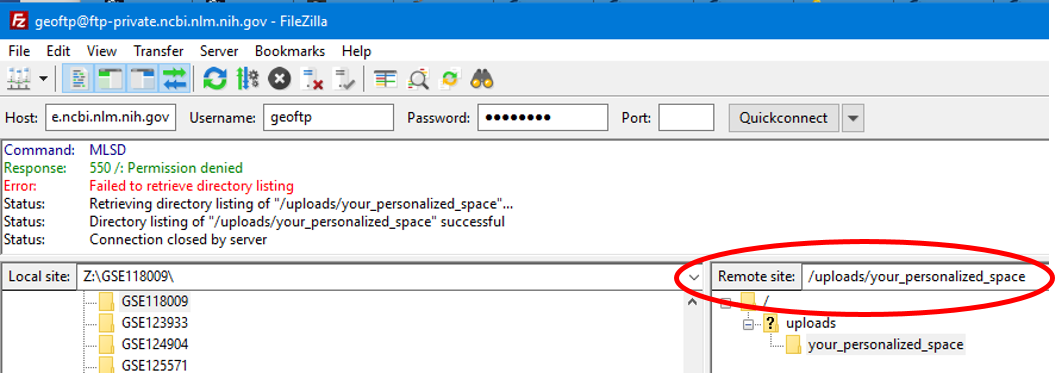
You tin can at present transfer files by dragging your folder containing all submission files from the 'Local site' window and dropping into your personalized upload space ('Remote site' window).
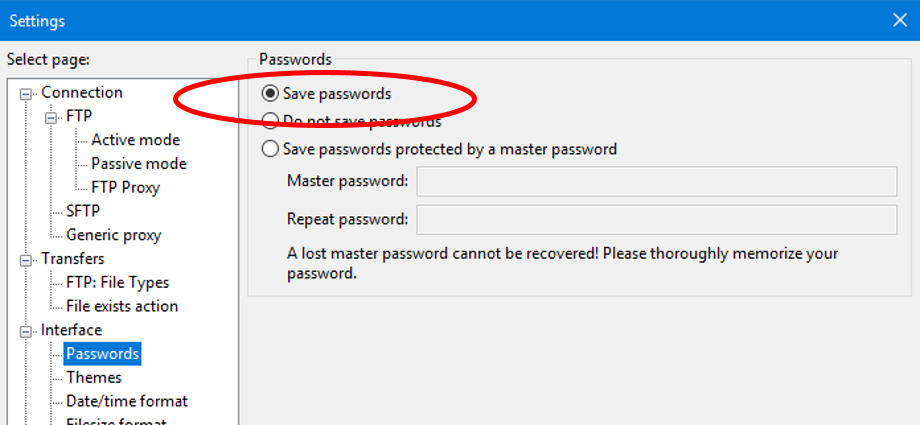
Annotation that you lot tin can avoid the "directory listing" error by using the 'Site Manager' to create a session with your personalized workspace as the default 'Remote site' location, as follows (screenshots are FileZilla version 3.45.i):
Step i. Go to 'Edit' -> 'Settings' -> 'Interface/Passwords' -> toggle 'Save passwords' on
Pace 2. Choose 'File' -> 'Site Director...'; Click on the 'New Site' button, enter a site name, then enter the ftp credentials in the 'General' tab, selecting a 'Normal' logon:

Footstep 3. Enter the path to your personalized workspace in the 'Advanced' tab under 'Default remote directory' and then click 'OK' (your path is: /uploads/):

Step 4. Employ the shortcut in the toolbar to connect to the server, or choose 'File' -> 'Site Manager...', select the site nether 'My sites' and then click 'Connect':

Example Windows sessions
Using gratuitous tertiary-party software, FileZilla Client
- Log in to server with:
host username password - After connecting, you volition meet an error:
Error: Failed to retrieve directory listing
[See the 'Connecting with FileZilla' section for how to avoid receiving this fault] - Replace '/' in 'Remote site' address bar with '/uploads/personal_folder_name' (do non include quotes) and striking 'Enter'
- Drag your folder containing all submission files from 'Local site' window and drop information technology into your personalized upload space ('Remote site' window)
Using Windows Explorer
- Paste this url into address box: ftp://:@/uploads/personal_folder_name
- Drag and drop your submission binder (from different Windows Explorer window) containing all submission files into your personalized upload space
Instance Mac Bone sessions
Using free third-party software, FileZilla Client
- Log in to server with:
host username password - Afterwards connecting, you will see an error:
Error: Failed to remember directory listing
[Run across the 'Connecting with FileZilla' section for how to avert receiving this error] - Replace '/' in 'Remote site' accost bar with '/uploads/personal_folder_name' (do non include quotes) and hit 'Enter'
- Drag your folder containing all submission files from 'Local site' window and drop it into your personalized upload space ('Remote site' window)
Using Last window
- Launch Terminal
- Cull Shell > New Remote Connection
- Select 'Secure File Transfer (sftp)' in the Service list
- Add (+) our server to server list as: s
- In the User field, enter 'geoftp' (no quotes), then click Connect
- At prompt, enter password:
- Once connected:
                  cd uploads/personal_folder_name
                  mkdir new_geo_submission
                  cd new_geo_submission
- Utilise 'lcd' to go to the local directory containing your submission files:
lcd local_path_to_your_files - Use the put control to place i file (or mput for multiple files) into the FTP directory:
                  put file_name
                  mput *
Using free third-party software, Cyberduck
- Launch Cyberduck, select 'Bookmark -> New Bookmark', and enter the post-obit details:
nickname GEOFTP (in this example) server username password - Click 'More than Options' and enter the 'Path' to your personalized upload space as:
uploads/personal_folder_name - To connect to the GEO server, get to 'Bookmarks' and choose 'GEOFTP'. You lot can now transfer files past dragging your binder containing all submission files into the Cyberduck browser window.
Example Linux/Unix sessions
Using 'ncftp'
                ncftp
                set passive on
                set and so-bufsize 33554432
                open
                cd uploads/personal_folder_name
                put -R Folder_with_submission_files
Using 'lftp'
                lftp
                cd uploads/personal_folder_name
                mirror -R Folder_with_submission_files
Using 'sftp' (expect slower transfer speeds since this method encrypts on-the-fly)
                sftp                @due south
                countersign:
                cd uploads/personal_folder_name
                mkdir new_geo_submission
                cd new_geo_submission
                put file_name
Using 'ncftpput' (transfers from the command-line without entering an interactive shell)
Usage case:
ncftpput -F -R -z -u -p "" ./uploads/personal_folder_name ./local_dir_path
local_dir_path: path to the local submission directory you are transferring to your personalized upload infinite
-F to use passive (PASV) data connection
-z is for resuming upload if a file upload gets interrupted
-R to recursively upload an entire directory/tree
MD5 Checksum
This is a 32-character alphanumeric string (e.1000. 7da8a01243d3ac4a4f0aa02a172bd476) that can be computed for each file with native command line tools 'md5' (Mac OS X) or 'md5sum' (Linux). Windows users will need to install Microsoft's File Checksum Integrity Verifier (FCIV) utility or download a 3rd-party utility to compute MD5 checksums (e.g. Hashtab). This allows u.s. to identify files that did not transfer successfully. The checksums tin can be included in the Metadata Template or as one or more plain text files in your upload.
Troubleshooting FTP
If you are having trouble with your FTP connectedness to NCBI, effort
- setting passive mode rather than active mode
- increasing FTP buffer size to 32 MB
- another host, or another platform (eastward.chiliad., Windows instead of Unix)
- a different FTP customer/software
- consulting with your IT/systems group for assist with your firewall configuration settings
Source: https://www.ncbi.nlm.nih.gov/geo/info/submissionftp.html
Posted by: chapmanancterionts.blogspot.com
0 Response to "How To Upload Raw Data To Geo"
Post a Comment